Step 1 – Navigating in WordPress Dashboard
Once the installation is complete, the first thing you would want to do is log in to the WordPress administrator dashboard.
Usually, there is a link to the login page on the front end of WordPress blog. However, some themes don’t have this link. In this case, the easiest way to log in to WordPress is by adding wp-admin at the end of your website’s address like this:
- http://www.yourdomain.com/wp-admin
This URL will direct you to the login screen where you will be asked to enter the administrator’s username and password. Remember, you have entered these details during WordPress installation. If you have forgotten your password, click on the Lost your password? Link.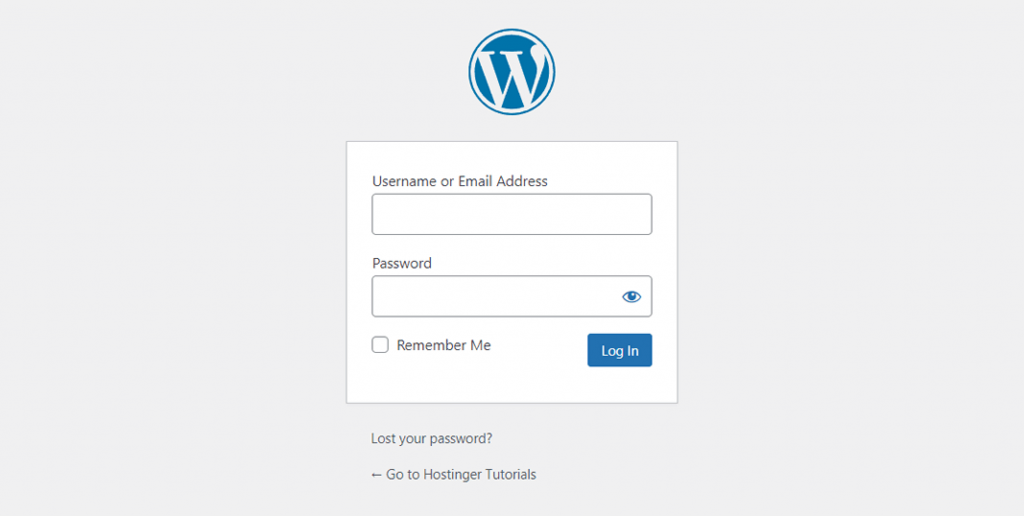
After logging in, you will see the administrator dashboard. It’s built to give you an overview of your entire website and contains 3 main sections:
- A toolbar at the top of the page. It contains links to the most commonly used administrative functions and resources. For example, if you hover over your website’s name, you will get a link to the public view of your site. It also displays simple notifications like updates and new comments count.
- The main navigation menu on the left-hand side. It contains links to all administrative screens of WordPress. If you hover over a menu item, a submenu with additional items will be displayed.
- The main work area.
The first time you log in to the WordPress admin panel, you will see a welcome module which contains some useful links to help you get started.
Once you are comfortable with the dashboard, press the Dismiss button in order to hide this module.
Other Modules:
- At a Glance box will tell you how many posts, pages and comments you have. It also shows WordPress version and theme you are running.
- Activity box gives you a bit more information about your latest posts and comments. It shows the status of all comments and a short list of the most recent comments.
- Quick Draft box. Entering content into this box will start a new blog post. However, you cannot publish one from here as this box is only for taking blog posts ideas for you to come back to later.
- WordPress News. This module displays the latest WordPress news.
Each of these windows has little arrows which you can use to quickly hide the box. You can also drag and drop them to different positions.
Step 2 – Publishing Content
Creating a website with WordPress starts with publishing a new post or a new page. You may wonder, what is the difference between posts and pages?
The answer is simple. WordPress posts can be categorized, tagged, archived. WordPress posts are used to publish time-sensitive content.
In contrast, pages are mainly for static, dateless content. They don’t have categories or tags. Contact us or About pages are good examples of pages.
Step 2.1 – Creating a New Post
To create a new WordPress post open the Add New section under Posts or choose New → Post option from the top toolbar.
You will be presented with an editing screen with an array of posting features. The first thing you should do is enter a title for your post.
Secondly, enter the actual content of your post using WordPress blocks in the field below. If you want to format your text, use the block toolbar options.
At the right-hand side of the screen, you can see the post settings panel. Each section has a particular function.
- Post Summary. Here you can change the status and visibility of your post, schedule it. If you want to make the post sticky, check the Stick to the top of the blog option.
- Categories. On this box, you can add, delete, or edit the category of your post.
- Tags box allows to quickly add new tags.
- Featured Image. Here you can assign a featured image to a post. It will be visible at the very top of the post (image location can be different depending on theme).
To publish the post, click the Publish button at the top-right corner of the editor screen.
Step 2.2 – Creating a New Page
In order to create a new WordPress page, open the Add New section under Pages menu or click New → Page button at the top toolbar.
Add New page section has identical block editor just like the Posts section has. Thus, the process of text input and formatting is the same.
You may also notice that Pages section does not have Tags and Categories options. Instead, it has a section called Page Attributes.
In this section, you can change the order of your pages and set parent pages. This is useful if you want to have several pages under one parent page.
Step 3 – Installing WordPress Plugins
The primary purpose of WordPress plugins is to expand WordPress functionality. Just by installing and activating a plugin you can add new features to WordPress site without any coding.
There are thousands of free and paid plugins built for different purposes – from social media sharing to security. Thus, you will surely find a plugin that fits your needs.
Installing WordPress plugins is an easy task even for a beginner. Free and freemium plugins are available on WordPress.org plugin directory.
Just like themes, these can be installed by using the inbuilt WordPress installer.
To install a WordPress plugin press the Add New button under Plugins and enter the name of the plugin you want to install in the search field. Hit Install and then Activate button.
There are thousands of premium (paid) WordPress plugins which cannot be installed from the official WordPress plugin directory. If you purchased a premium plugin, you would have to manually upload it to WordPress.
The process is quite similar to themes installation. To proceed, press the Add New button under Plugins and hit Upload Plugin. Now select a plugin archive and upload it. Finally, install and activate the plugin.

Essential WordPress Plugins
There are so many WordPress plugins – it could be hard to choose the right one. In fact, many of the plugins serve the same purpose, for example, there are dozens of WordPress caching plugins.
That is why we decided to list the best WordPress plugins that are essential for every WordPress blog.
- Google XML Sitemaps. This plugin will automatically generate XML site maps for better search engine optimization. It’s easy to use and update it regularly.
- Yoast SEO. Probably the most popular SEO plugin for WordPress. It will help you improve the search engine optimization. From meta tags to writing suggestions – Yoast SEO plugin has it all.
- Wordfence Security. This plugin will keep your WordPress safe from hackers and malware. It has firewall and malware scanner modules which are super useful.
- Contact Form 7. Simple but very powerful WordPress contact form plugin. Create any contact or even lead generation forms with this plugin.
Step 5 – Installing WordPress Themes
The look of WordPress site can be changed by applying themes. There are free and premium WordPress themes. Some of them are universal and can be used on any website. Others are built for a very specific purpose, for example, the e-commerce themes.
WordPress made theme installation super easy. It literally takes just a few minutes to install free WordPress themes.
In order to proceed, access the Appearance section and search for some nice-looking free WordPress themes. You can even filter themes by features or colors.
Theme preview feature lets you see how your website will look with a selected theme. This is useful, as it will save your time – you will not have to install multiple themes just to find the theme that fits your needs.
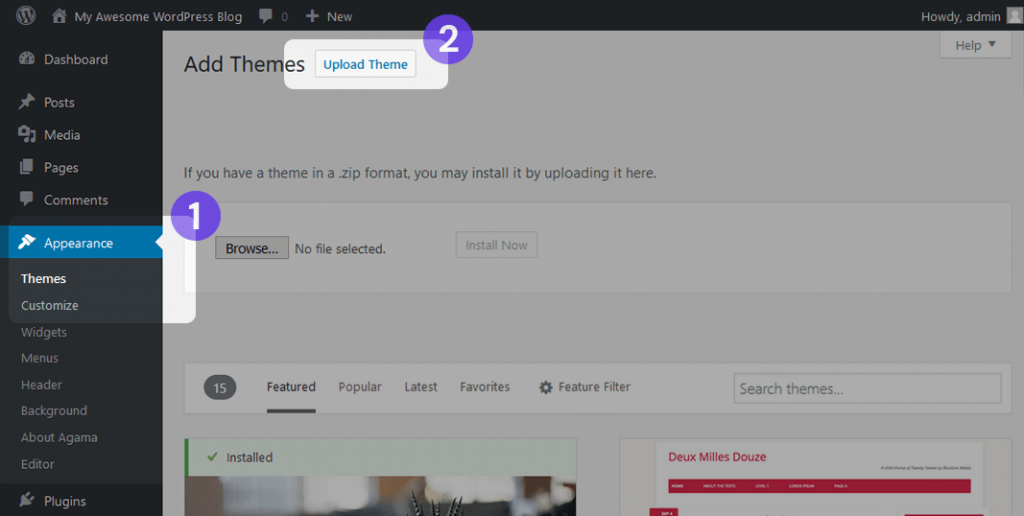
The above method is suitable for free and freemium themes only. What if you purchased a nice looking premium theme? In this case, you will have to upload the theme files manually.
Access the same Appearance section, press the Upload Theme button and select the theme’s .zip file. It can take up to a few minutes for the uploading process to complete. Once it’s done, simply Activate the theme.
Step 6 – Optimizing WordPress Performance
In this WordPress tutorial, we have now learned how to install and use WordPress in order to create and manage your very own website. As your WordPress site grows, so does the amount of text, images, code and other media files.
A bigger website means that it will take longer to load. To avoid slow response time in WordPress, you should also invest some time in optimization.
It will ensure that your pages load quickly and efficiently, thus, leaving your visitors happy and wanting to come back for more.
Everyone has encountered a slow website at least a few times and felt the frustration that comes while waiting endlessly for it to load.
Taking that into account, spending some time to improve your WordPress speed is a really good idea. The best part about WordPress is that it’s really easy to optimize due to the number of plugins and other tools available.
You can make your WordPress site lightning fast without even having any coding knowledge at all. To get you on the right track, we will cover a few WordPress optimization techniques that will provide a notable speed boost to your website.
Step 6.1 – Using WordPress Caching Plugins
The first step in optimizing your WordPress site is setting up a WordPress caching plugin. Is short, a cache is a temporary data storage. In most cases, active data is cached which results in reduced loading times.
For example, when you access a frequently visited site, your browser will have a portion of the site’s static content located in its cache.
As a result, the browser needs to request fewer files and information from the server which ultimately leads to quicker loading.
WordPress caching plugins work by creating a static version of your website and delivering it, instead of loading all PHP scripts every time when someone refreshes or re-enters your site.
Most popular WordPress caching plugins are:
You can find a detailed guide on how to implement caching for your WordPress website.
Step 6.2 – Optimizing WordPress Images
Image optimization is another crucial task that should be done in order to make your WordPress site fast. Generally, there are 2 main issues that cause images to load slowly:
- Using images that are too large. For example, you upload a 500 x 500 dimension picture but your site resizes it to 100 x 100. As a result, the visitor’s browser will have to download the larger file first, scale it down and only then display it. The proper way would be to simply upload a 100 x 100 dimension picture so that the excessive task of scaling down the image would be avoided. The image would also take up less space that way, resulting in an overall boost of speed. To make things easier, we prepared a detailed guide on improving website performance with scaled images.
- Images are not fully compressed. You can save lots of space and bandwidth by properly compressing your images. Luckily, WordPress has a really great plugin that can help you with that. Read how to implement this WordPress image optimization plugin and optimize your WordPress images.
The more images your WordPress site has, the more beneficial this optimization task will be.
Step 6.3 – Enabling gzip Compression for WordPress
Enabling gzip compression for a WordPress website is a great way to increase speed and performance. In short, gzip compression works by finding similar strings in a text file and replacing it temporarily, resulting in a smaller file size.
HTML and CSS files have a lot of repetitive text and spaces, making gzip compression very effective. On the whole, it can reduce the size of a WordPress page by up to 50-70%.
There are a few ways to enable gzip compression:
- Enabling gzip compression via .htaccess file (recommended). A more detailed WordPress tutorial can be found here.
- Enabling gzip compression via WordPress plugins, such as GZip Ninja Speed.
One thing that you should keep in mind is that gzip compression may slightly increase CPU usage. If CPU is not an issue, then gzip compression is a really great way to optimize your WordPress site.
Step 6.4 – Deferring parsing of JavaScript in WordPress
Most themes, plugins and social media add-ons use a lot of JavaScript which is by default loaded first when accessing a site. This will make the HTML and other visual contents appear only after the JS is loaded.
You can defer parsing of JavaScript so that the visual elements appear faster, while various social media buttons and other content that uses JavaScript would be loaded afterwards.
This is one of the techniques recommended by Speed Booster Pack. See our more detailed tutorial on how to defer parsing of JavaScript in WordPress.
Step 6.5 – Using a Content Delivery Network
Implementing a content delivery network (CDN for short) will speed up WordPress by caching content in multiple data centers around the world.
After a visitor enters your site, the content will be delivered by the nearest datacenter available resulting in a better front-end experience.
CDNs also work great with WordPress caching plugins and there are free solutions to get you started. For example, CloudFlare has a free plan which provides both benefits of a CDN while protecting your site from DDoS attacks.
Step 6.6 – Removing Query Strings from Static Resources
GTMetrix and other optimization tools suggest removing query strings from CSS and JS in order to improve caching of those elements.
Read our article on how to remove query strings for static sources.
Step 6.7 – Enabling Lazy Loading
Generally, when a web page is opened, all the content is loaded instantly, which is called eager loading. Alternatively, it is possible to delay the initialization of some objects (such as images) until they are needed, which is called lazy loading.
The most common practice is displaying images only when they are visible from the visitor’s viewpoint or on the screen.
All you need to do in order to take advantage of this technique is to install and enable a plugin such as Rocket Lazy Load.
Step 7 – Keeping WordPress Secure
Last but not least, in order to have a successful WordPress site, you must harden its security. Just as WordPress is the most popular CMS in the world, it also turns out to be the most hacked.
However, there are quite a few things that you can do in order to protect your site against hacking and other malicious activity.
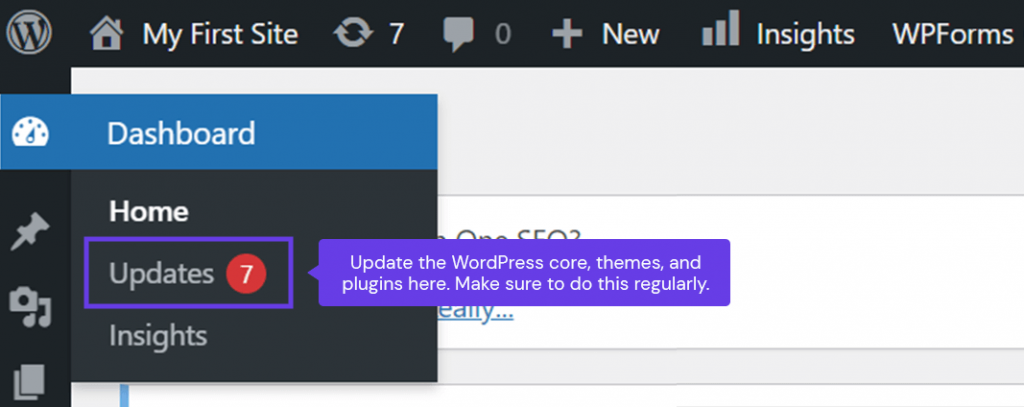
Step 7.1 – Keeping WordPress Updated
One of the most important factors in having a safe environment is to always update and use the latest version of WordPress, themes and plugins.
Most updates include security tweaks, vulnerability fixes and prevent them from being exploitable in the future versions.
A common practice among hackers is taking advantage of web pages that are running an outdated version of WordPress with a known vulnerability.
By default, WordPress is updated automatically upon the release of a new version, however, it may not always work or the feature may be disabled on some hosts.
Generally, when a new version of WordPress arrives, a notification will be shown at the top of your Dashboard. You may also update your themes and plugins via Dashboard → Updates section.
Step 7.2 – Using Unique Usernames and Passwords
Admin is the username set by default in all WordPress installations. It is highly recommended to change it, as it will add an extra layer of security to your login credentials.
Imagine a situation where someone knows your password, however, they are not aware of the username.
The end result is that the person will still be unable to access your dashboard because they do not know the username. Leaving the value as admin can make the hacker’s job that much easier, therefore it should always be changed.
When setting up a password, make sure to include numbers, capital letters and special symbols. In case you are having difficulties keeping track of all the passwords, you can store them using such tools as Last Pass.
It will save the trouble of remembering all the different passwords while allowing you to go wild on the password difficulty.
Step 7.3 – Backing up WordPress
Generating WordPress backups is a crucial task for any website. Not only will it increase your security, but will also provide you with a reliable way of restoring your site in case of unexpected errors or issues.
You can perform a backup manually or use automation. The manual process would involve downloading the files and the MySQL database of a WordPress site.
However, if you make lots of new posts, changes, or manage several different websites, downloading everything manually each time can be a real hassle.
In addition, nowadays, most hosting providers offer automated account backups. As an extra security measure, you can use WordPress plugins to automate backups monthly, weekly or even daily.
They will save you lots of time and also give the option of storing the backup WordPress files and database to a remote location such as DropBox. You can use such plugins as:
- UpdraftPlus is a plugin with the ability to backup WordPress to a remote location and restore it.
- BackUpWordPress is a light-weight backup plugin with automation. It allows you to exclude certain folders, schedule the execution time and has support for several different languages.